
Introduction#
Because I do not have access to a commercial Synopsys license, I previously ran simulation and synthesis inside a virtual machine that already had the Synopsys tools installed. The problem was poor hardware utilization. The same project took much longer to simulate or synthesize in the virtual machine than it did with tools such as Vivado on Windows. The virtual machine’s GUI was also far less pleasant to use than VS Code. I therefore decided to configure the Synopsys toolchain in WSL 2.
Choosing the Environment#
I wanted a Linux distribution that could be accessed through VS Code’s Remote - WSL extension. The VS Code documentation ↗ lists several distribution and version requirements.
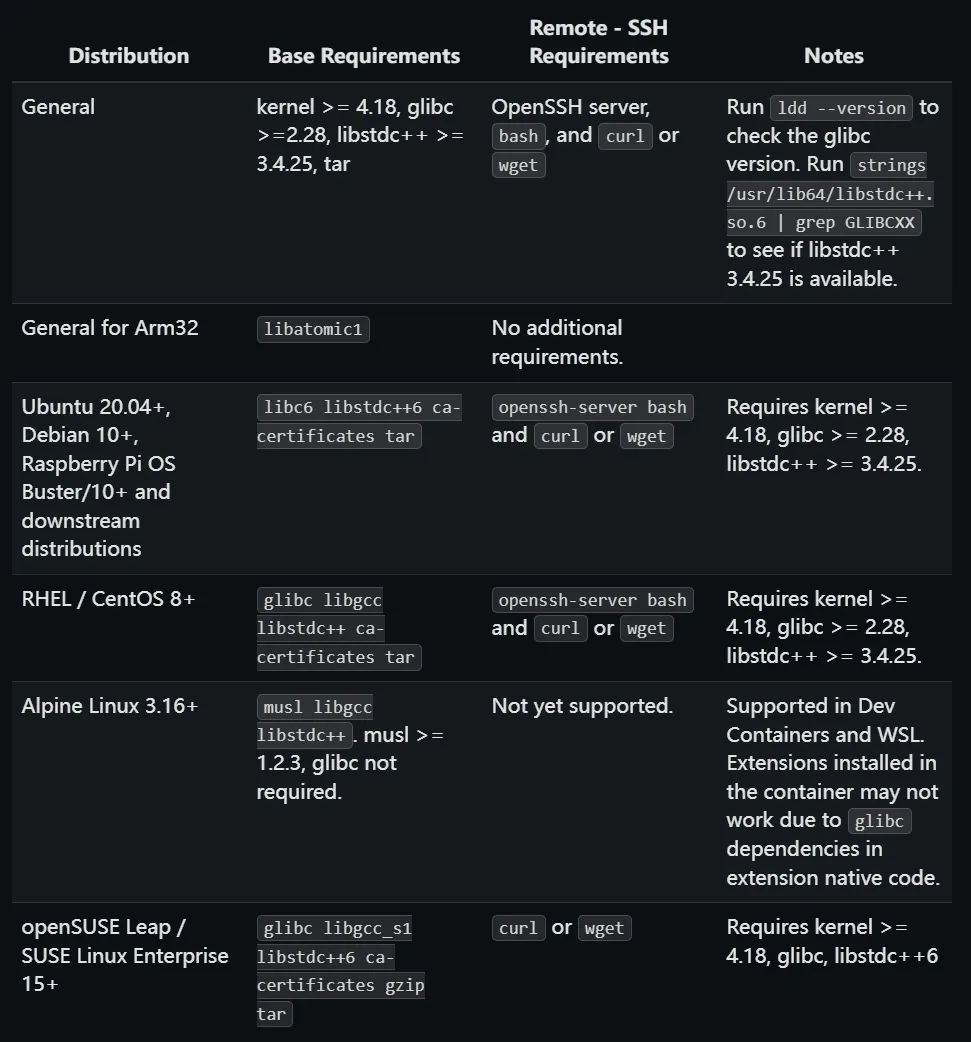
CentOS generally offers good compatibility with EDA tools. However, I had heard that older Synopsys releases, including the versions available to me, can have additional limitations on CentOS, and I was less familiar with that distribution. I therefore chose Ubuntu 20.04.
The complete environment used in this guide is:
Windows 11
WSL 2
Ubuntu 20.04.6 LTS
VS Code Remote - WSL
Synopsys 2018:
  SCL 2018.06
  VCS O-2018.09-SP2
  Verdi O-2018.09-SP2
Design Compiler O-2018.06-SP1Installing WSL 2#
Windows 11 does not appear to offer Ubuntu 20.04 directly in every installation flow. A default installation can also consume a great deal of space on the system drive. I chose to download an image ↗ and import it manually instead. For x86-64 systems, download ubuntu-20.04.6-wsl-amd64.wsl ↗.
I prefer to store the image and the installed operating system separately:
EDA-Tools
  - images
- OSImport the distribution with:
wsl --import [distribution-name] [OS-directory] [image-file] --version 2Then start it. My distribution is named Ubuntu20.04-EDA:
wsl -d Ubuntu20.04-EDAInitial Configuration#
First, configure an APT mirror. Using a proxy for the WSL distribution is another option.
The mirror configuration can be based on the Tsinghua University Open Source Software Mirror ↗. Ubuntu 20.04 is no longer shown in the current selector, so this is the configuration I used:
# Ubuntu 20.04 LTS
deb https://mirrors.tuna.tsinghua.edu.cn/ubuntu/ focal main restricted universe multiverse
deb https://mirrors.tuna.tsinghua.edu.cn/ubuntu/ focal-updates main restricted universe multiverse
deb https://mirrors.tuna.tsinghua.edu.cn/ubuntu/ focal-backports main restricted universe multiverse
deb https://mirrors.tuna.tsinghua.edu.cn/ubuntu/ focal-security main restricted universe multiverse

# Source packages are normally unnecessary, so they remain disabled.
# deb-src https://mirrors.tuna.tsinghua.edu.cn/ubuntu/ focal main restricted universe multiverse
# deb-src https://mirrors.tuna.tsinghua.edu.cn/ubuntu/ focal-updates main restricted universe multiverse
# deb-src https://mirrors.tuna.tsinghua.edu.cn/ubuntu/ focal-backports main restricted universe multiverse
# deb-src https://mirrors.tuna.tsinghua.edu.cn/ubuntu/ focal-security main restricted universe multiverseReload the shell configuration when necessary:
source ~/.bashrcAfter configuring the mirror, install the required dependencies:
sudo apt install -y \
  build-essential make gcc g++ gcc-multilib g++-multilib \
  vim nano wget curl unzip tar gzip bzip2 file \
  csh ksh tcsh net-tools iproute2 lsb-release \
  x11-apps mesa-utils \
  libx11-6 libxext6 libxi6 libxrender1 libxtst6 libxss1 \
  libxft2 libxmu6 libxpm4 libxrandr2 libgtk2.0-0 \
  libncurses5 libtinfo5 \
  libcanberra-gtk-module libcanberra-gtk3-module \
fontconfig xfonts-base xfonts-75dpi xfonts-100dpiSome other guides list libnsl2 as a requirement. It may not be installable in this environment and can prevent parts of a GUI-oriented installation from completing, but I later found that it was not required for my setup.
Install the remaining graphical packages:
sudo apt install -y x11-apps mesa-utils xtermReplacing dash#
Ubuntu uses dash as the default implementation of /bin/sh, while Synopsys scripts expect behavior closer to Bash. Reconfigure the shell with:
echo "dash dash/sh boolean false" | sudo debconf-set-selections
sudo DEBIAN_FRONTEND=noninteractive dpkg-reconfigure dashVerify the result:
ls -l /bin/shThe expected output is:
/bin/sh -> bashInstalling MobaXterm#
The Synopsys installer uses a graphical interface. GUI support in a VS Code remote environment can be inconvenient, so I used MobaXterm ↗ to run the installer and other graphical tools.
Preparing the Installation Packages#
At this point, the base WSL 2 environment is ready and the Synopsys installation packages can be prepared.
This article ↗ describes the Synopsys 2018 packages used in the original setup. Make sure that you obtain and use Synopsys software and licenses through channels permitted by your organization and the applicable license agreement.
After downloading and extracting the packages, copy them into WSL 2. Windows drives are exposed as mount paths. For example:
/mnt/f/Synopsys/Synopsys2018/synopsysinstaller_v5.0.rarThe package names used here are:
- Installer:
synopsysinstaller_v5.0.rar - VCS:
vcs_vO-2018.09-SP2 - Design Compiler:
syn_vO-2018.06-SP1 - Verdi:
verdi-2018.09 - SCL:
scl_v2018.06
Use cp -av to copy the packages into the distribution. I recommend keeping installation packages under the home directory and installing the software itself under /opt/synopsys.
mkdir -p ~/eda/synopsys/installersudo mkdir -p /opt/synopsysRunning Synopsys Installer#
After extracting the installer, enter its directory, grant execute permission, and start it:
cd ~/eda/synopsys/installer/synopsysinstaller_v5.0
chmod +x SynopsysInstaller_v5.0.run
./SynopsysInstaller_v5.0.runIf the extracted package provides setup.sh, run:
chmod +x setup.sh
./setup.shI recommend installing the tools in this order:
1. SCL 2018.06
2. VCS O-2018.09-SP2
3. Verdi O-2018.09-SP2
4. Design Compiler O-2018.06-SP1For the detailed installer flow and path selection, refer to the linked article. The first path selected in the installer is the location of the installation package. The second is the software installation directory under /opt/synopsys.
Configuring the License#
The license setup also follows the linked article ↗. Use only a valid license that you are authorized to run.
One important detail is that the host name usually differs from the article’s localhost.localdomain. I am not completely certain which parts of this step are necessary in every environment, but configuring the hosts file can prevent a mismatch between the host name and the license.
sudo cp /etc/hosts /etc/hosts.bak
sudo nano /etc/hostsAn example configuration is:
127.0.0.1       localhost localhost.localdomain
127.0.1.1       Puff Puff.localdomain

# The following lines are desirable for IPv6-capable hosts.
::1             localhost ip6-localhost ip6-loopback
fe00::0         ip6-localnet
ff00::0         ip6-mcastprefix
ff02::1         ip6-allnodes
ff02::2 ip6-allroutersReplace Puff with your own host name. A manually managed hosts file can prevent the VS Code WSL service from reconnecting if WSL overwrites it. Edit /etc/wsl.conf as follows:
[network]
generateHosts = false

[user]
default = puffReplace puff with your WSL user name. If your existing file contains unrelated settings, preserve the ones your environment needs.
Configuring Environment Variables#
This step adds the tools to the system path and configures the license server. Add the following content to ~/.bashrc:
# ================= Synopsys 2018 =================

export SYNOPSYS_ROOT=/opt/synopsys

# VCS / DVE
export VCS_HOME=$SYNOPSYS_ROOT/vcs/O-2018.09-SP2
export VCS_MX_HOME=$SYNOPSYS_ROOT/vcs-mx/O-2018.09-SP2
export DVE_HOME=$VCS_HOME

# Verdi
export VERDI_HOME=$SYNOPSYS_ROOT/verdi/Verdi_O-2018.09-SP2

# SCL
export SCL_HOME=$SYNOPSYS_ROOT/scl/2018.06

# Design Compiler
export DC_HOME=$SYNOPSYS_ROOT/syn/O-2018.06-SP1

# Executable path
export PATH=$SCL_HOME/linux64/bin:$VCS_HOME/bin:$VCS_HOME/gui/dve/bin:$VERDI_HOME/bin:$DC_HOME/bin:$PATH

# Library path
export LD_LIBRARY_PATH=$VERDI_HOME/share/PLI/VCS/LINUX64:$VCS_HOME/linux64/lib:$LD_LIBRARY_PATH

# Compatibility
export VCS_ARCH_OVERRIDE=linux

# License server
export LM_LICENSE_FILE=27000@Puff
export SNPSLMD_LICENSE_FILE=$LM_LICENSE_FILE

# Manual license control
alias start-eda='lmgrd -c /opt/synopsys/scl/2018.06/admin/license/Synopsys.dat -l ~/lmgrd.log'
alias lms_synopsys='lmstat -a -c 27000@Puff'
alias lmk_synopsys='pkill -f lmgrd; pkill -f snpslmd'

# =================================================start-eda is the command I use to start the license manager. Adjust the paths, host name, and port for your authorized environment.
For later sessions, start the license manager with:
start-edaToolchain Dependencies#
VCS and Design Compiler may require older libraries. This is a common compatibility problem when old EDA releases are used on a newer operating system, but the following workarounds solved the issues in this environment.
VCS#
On its first launch, VCS reported:
/opt/synopsys/vcs/O-2018.09-SP2/bin/vcs: line 3312: dc: command not foundInstall dc:
sudo apt install -y dcThe build log may also contain many linker errors:
/usr/bin/ld: ... undefined reference to ...
collect2: error: ld returned 1 exit statusUbuntu 20.04 cannot link simv correctly with the default options used by this release. Add the following VCS link option when compiling:
-LDFLAGS "-Wl,--no-as-needed"Verdi#
Verdi requires libpng12.so.0. Install the older package with:
cd /tmp
wget http://security.ubuntu.com/ubuntu/pool/main/libp/libpng/libpng12-0_1.2.54-1ubuntu1.1_amd64.deb
sudo dpkg -i libpng12-0_1.2.54-1ubuntu1.1_amd64.debDesign Compiler#
Design Compiler requires libtiff.so.3 and libmng.so.1. Install the available libraries and create compatibility symbolic links:
sudo apt install -y libtiff5
sudo ln -sf /usr/lib/x86_64-linux-gnu/libtiff.so.5 /usr/lib/x86_64-linux-gnu/libtiff.so.3
sudo ldconfigsudo apt install -y libmng2
sudo ln -sf /usr/lib/x86_64-linux-gnu/libmng.so.2 /usr/lib/x86_64-linux-gnu/libmng.so.1
sudo ldconfigGetting Started#
The installation is now complete. Check that VCS, Design Compiler, and Verdi all start correctly.
For a more comfortable development environment, I also recommend:
- The Digital HDL extension for syntax highlighting.
- Codex or Copilot for investigating environment-specific problems that are not covered here.